🔥 Why Docker is the Secret Sauce for Network Automation?
Docker is like a special box that lets you run your apps anywhere—on your computer, in the cloud, or even on a small device like a Raspberry Pi. For network automation, Docker makes it easy to use free network tools without worrying about difficult setups or system problems.
It’s like putting your app in a lunchbox—you can take it anywhere without making a mess. The best part? It’s a simple and cheap way to use the latest technology!
Key Benefits of Docker in Network Automation:
- Isolation: Each tool runs in its own container, which keeps things neat and tidy.
- Portability: You can take your configurations anywhere.
- Scalability: Whether it\’s one device or a hundred, Docker can handle it.
Now that you know the why, let’s dive into the how! First, let\’s install Docker. Then, we’ll explore Docker Compose, which makes managing multi-container apps a breeze.
🛠️ Step 1: Installing Docker
For Linux (Ubuntu):
First things first—let\’s install Docker. Follow these simple steps:
    # Update your existing packages
    sudo apt-get update

    # Install Docker prerequisites
    sudo apt-get install apt-transport-https ca-certificates curl software-properties-common

    # Add Docker’s official GPG key and repository
    curl -fsSL https://download.docker.com/linux/ubuntu/gpg | sudo apt-key add -
    sudo add-apt-repository "deb [arch=amd64] https://download.docker.com/linux/ubuntu $(lsb_release -cs) stable"

    # Install Docker
    sudo apt-get update
    sudo apt-get install docker-ce
For Windows or macOS:
- Download Docker Desktop from the Docker website.
- Install it like any other application.
- Verify by opening the terminal and typing or use docker GUI:
docker --version
🛠️ Step 2: Installing Docker Compose
Docker Compose is like Docker\’s best buddy. It helps you define and run multi-container Docker applications with ease. Think of it as a multi-tasking wizard!
For Linux (Ubuntu):
# Download Docker Compose
sudo curl -L https://github.com/docker/compose/releases/download/1.29.2/docker-compose-$(uname -s)-$(uname -m) -o /usr/local/bin/docker-compose

# Make Docker Compose executable
sudo chmod +x /usr/local/bin/docker-compose

# Verify the installation
docker-compose --version
For Windows or macOS:
If you\’re using Docker Desktop, Docker Compose is already installed. Just verify it:
docker-compose --version
🧙♂️ Step 3: Running Your First Dockerized App with Docker Compose
Let’s break down the magic of Docker Compose with a simple example. Imagine we want to run a basic web app and a database together (a common setup for network automation tools like NetBox).
1. Create a directory for your project:
mkdir my-docker-project
cd my-docker-project
2. Create a docker-compose.yml file :
Which is an automation file to do some tasks
version
services:
  web:
    image: nginx
    ports:
      - 8080:80
  db:
    image: postgres
    environment:
      POSTGRES_PASSWORD: example
This is a simple Docker Compose file that defines two services: web and db. Below is an explanation of each part:
- version: This specifies the version of the Docker Compose file format being used. It ensures compatibility between the Docker Compose tool and your services.
- services: Defines the services that will be part of this multi-container Docker application.
- web:
- This service uses the nginx image, which is a lightweight web server.
- The
portssection exposes port8080on the host machine and maps it to port80inside the container (the default HTTP port). - When you access
localhost:8080, you are actually interacting with the nginx web server running in the container.
- db:
- This service uses the Postgres image, which sets up a PostgreSQL database.
- The
environmentsection defines environment variables for the container. In this case, it’s setting thePOSTGRES_PASSWORDto"example", which is required by PostgreSQL to secure the database.
- web:
This file allows you to launch both a web server (nginx) and a database (PostgreSQL) with a single command, making it a great tool for testing or lightweight development environments.
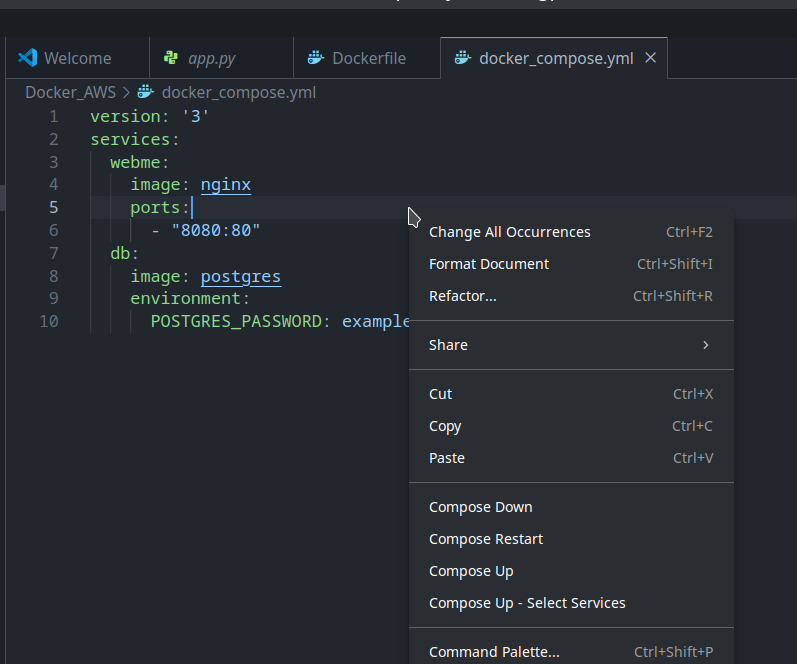
Below screenshot from VSCode , where you can write and directly click compose up .
Note: you must download vscode https://code.visualstudio.com/Download and then install docker plugin

Here’s what’s happening:
- We define two services:
webanddb. - The
webservice uses the nginx image and exposes port 8080. - The
dbservice uses the postgres image with a simple password setup.
3. Run the Docker Compose command:
docker-compose up
You could check if the docker are running by running below command
docker ps

Open your browser and navigate to http://localhost:8080 to see your web app running! 🎉

🚀 What’s Next?
Now that you\’ve got Docker and Docker Compose under your belt, you\’re ready to take on more powerful network automation tools. Next up, we\’ll use Docker to install and manage essential apps like NetBox (a powerful IP address management tool) and NetMon (for monitoring your network).
In the next post, we’ll dive into NetBox installation using Docker and how it fits into your network automation journey.
🐍 Your Python and Network Automation Toolbox Awaits!
You’ve just learned the basics of Docker, and you’re one step closer to network automation mastery. Stay tuned for the next part of our journey where we’ll set up NetBox and explore how to automate all the things!

